ltaoo's web

前端路由与菜单

目前绝大部分单页应用都由前端控制路由,如react可以使用react-routervue可以使用vue-router。路由库的使用已经有非常多的文章来介绍,所以本文的重点在于「基于路由配置自动生成导航菜单」,所用技术栈为react + react-router-dom + antd

为什么是菜单呢?
它绝大部分内容和路由是相同的,但又有部分不同,如果维护两份带来的是巨大的维护成本,只需要修改一处即可同步路由与菜单的变化。

本文目标读者为了解基本的react-router使用,想要在项目中通过路由配置自动生成导航菜单,并正确处理菜单的高亮。

贯穿全文的需求

本文会以如下页面作为示例,逐步优化,实现我们预期的效果。

商品列表

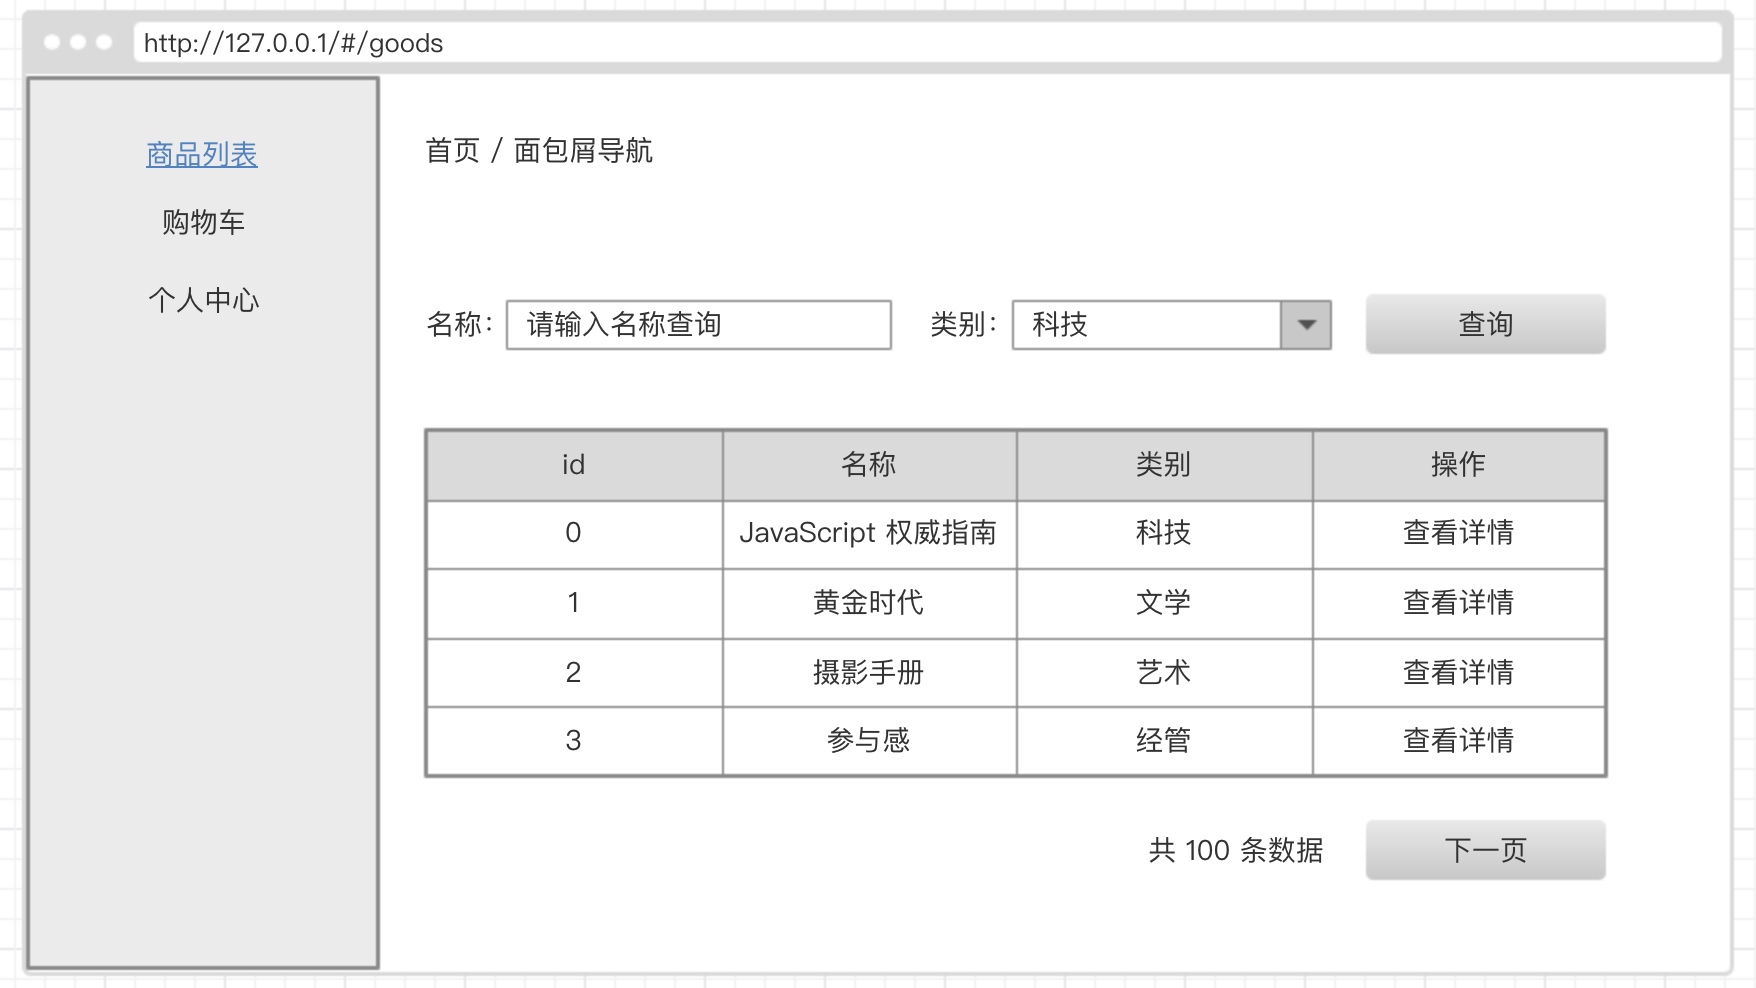
应用有四个页面,分别为「商品列表」、「商品详情」、「购物车」和「个人中心」;当访问/goods时,菜单「商品列表」高亮,同时右侧展示商品列表;

商品详情

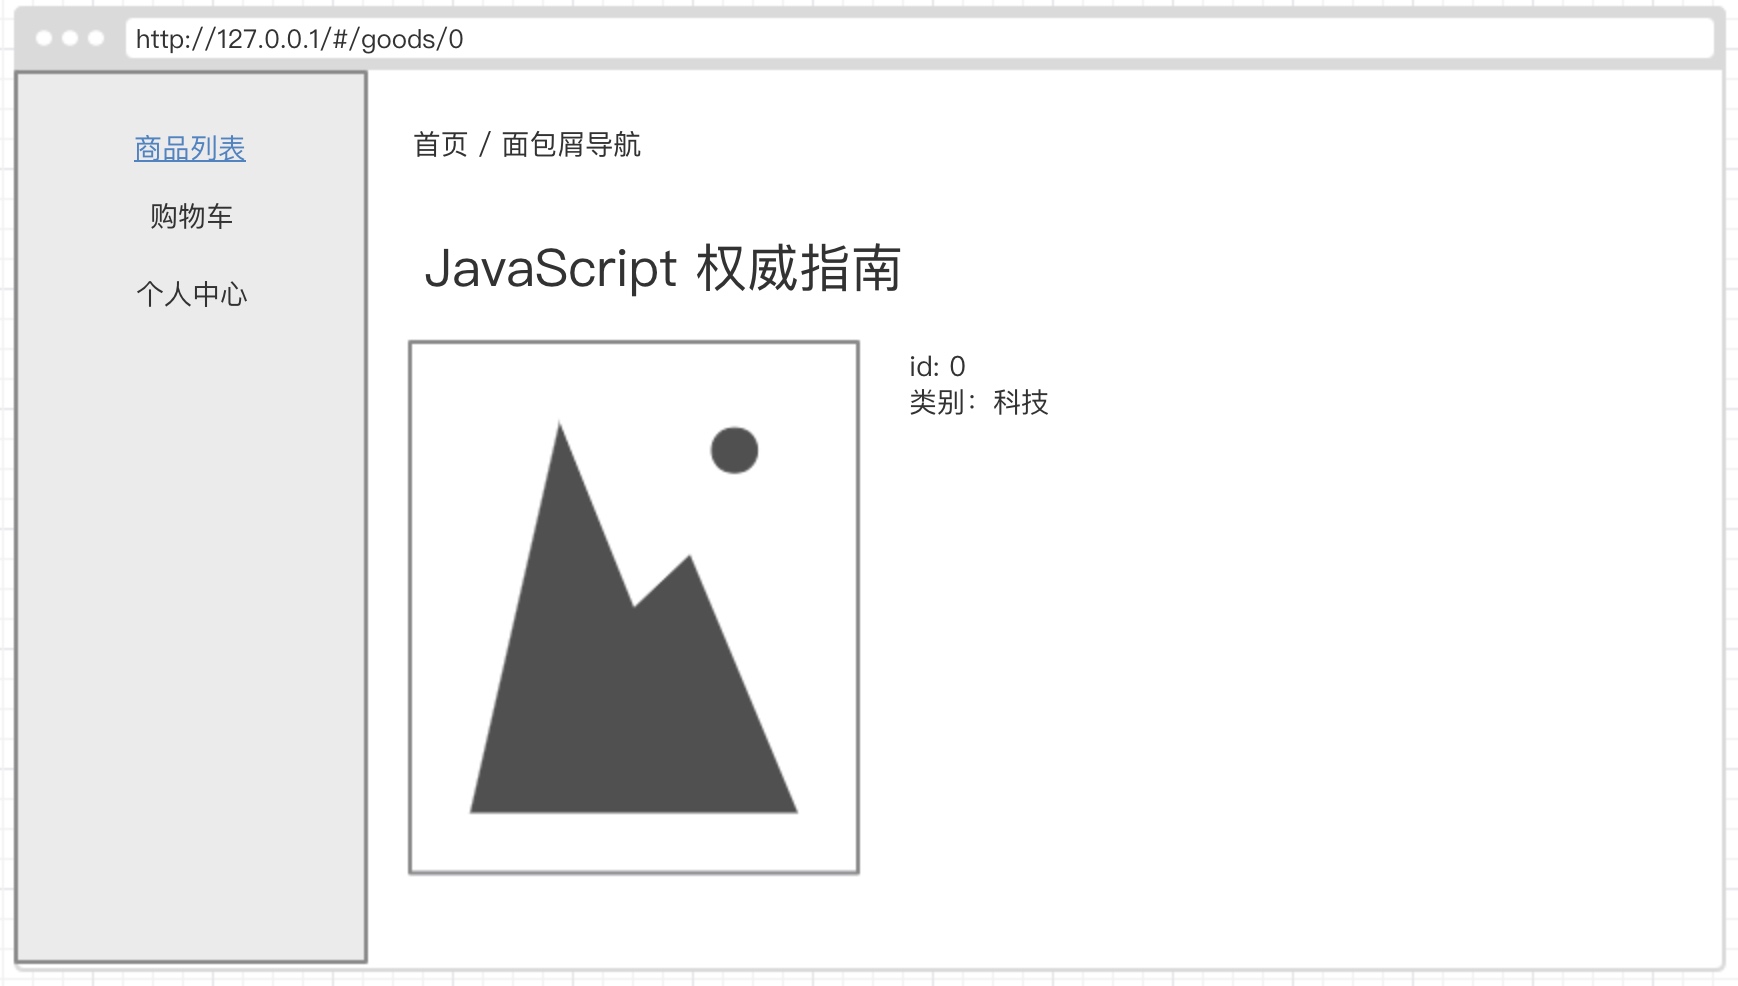
点击商品列表中任意一条「查看详情」,则跳转至/goods/0,同时「商品列表」仍保持高亮状态,右侧展示商品详情。

配置方式的转变

最简单的配置

在了解需求后,我们可以很快得到如下配置(线上实例):

1
2
3
4
5
6
7
8
9
10
11
12
13
14
15
16
17
18
19
20
21
22
export default function RouterConfig() {
return (
<Router>
<div>
<Link to="/">首页</Link>|
<Link to="/goods">商品列表</Link>|
<Link to="/cart">购物车</Link>|
<Link to="/info">个人中心</Link>
<Switch>
<Route path="/" exact component={Home} />
<Route path="/goods" exact component={Goods} />
<Route path="/goods/:id" component={GoodsDetail} />
<Route path="/cart" component={Cart} />
<Route path="/info" component={Info} />
</Switch>
</div>
</Router>
);
}

const rootElement = document.getElementById('root');
ReactDOM.render(<RouterConfig />, rootElement);

相比之前,react-router更加灵活,也更易于理解了,但如果出现嵌套路由,则路由配置将分散在多处,不利于管理,以及无法自动生成菜单。

集中维护路由配置

所以还是需要以集中管理的形式来对路由进行配置,对应上面的例子,我们可以得出如下的配置:

1
2
3
4
5
6
7
8
9
10
11
12
13
14
15
16
17
18
19
20
21
22
23
24
25
26
27
const routes = [
{
path: '/',
name: '首页',
component: Home,
},
{
path: '/goods',
name: '商品列表',
component: Goods,
},
{
path: '/goods/:id',
name: '商品详情',
component: GoodsDetail,
},
{
path: '/cart',
name: '购物车',
component: Cart,
},
{
path: '/info',
name: '个人中心',
component: Info,
},
];

那么与之对应的路由组件为:

1
2
3
4
5
6
7
8
<Router>
<Route
path="/"
render={props => {
return <BasicLayout {...props} routes={routes} />;
}}
/>
</Router>

新增的布局概念

这里出现了BasicLayout,就是前面提到的嵌套路由,引入的目的是为了解决部分页面布局不同的问题,如登录页不会显示菜单,而开始的配置方式,无论如何都会显示出<Link to="/">首页</Link>|这部分组件。
routes传入,并在BasicLayout组件内再做路由配置。BasicLayout大概长这样(线上示例):

1
2
3
4
5
6
7
8
9
10
11
12
13
14
15
16
17
18
19
20
21
22
23
24
25
26
class BasicLayout extends React.Component {
render() {
return (
<Layout>
<Sider>
<Menu />
</Sider>
<Header />
<Content>
<Switch>
{routes.map(route => {
return (
<Route
key={route.path}
path={route.path}
exact
component={route.component}
/>
);
})}
</Switch>
</Content>
</Layout>
);
}
}

BasicLayout

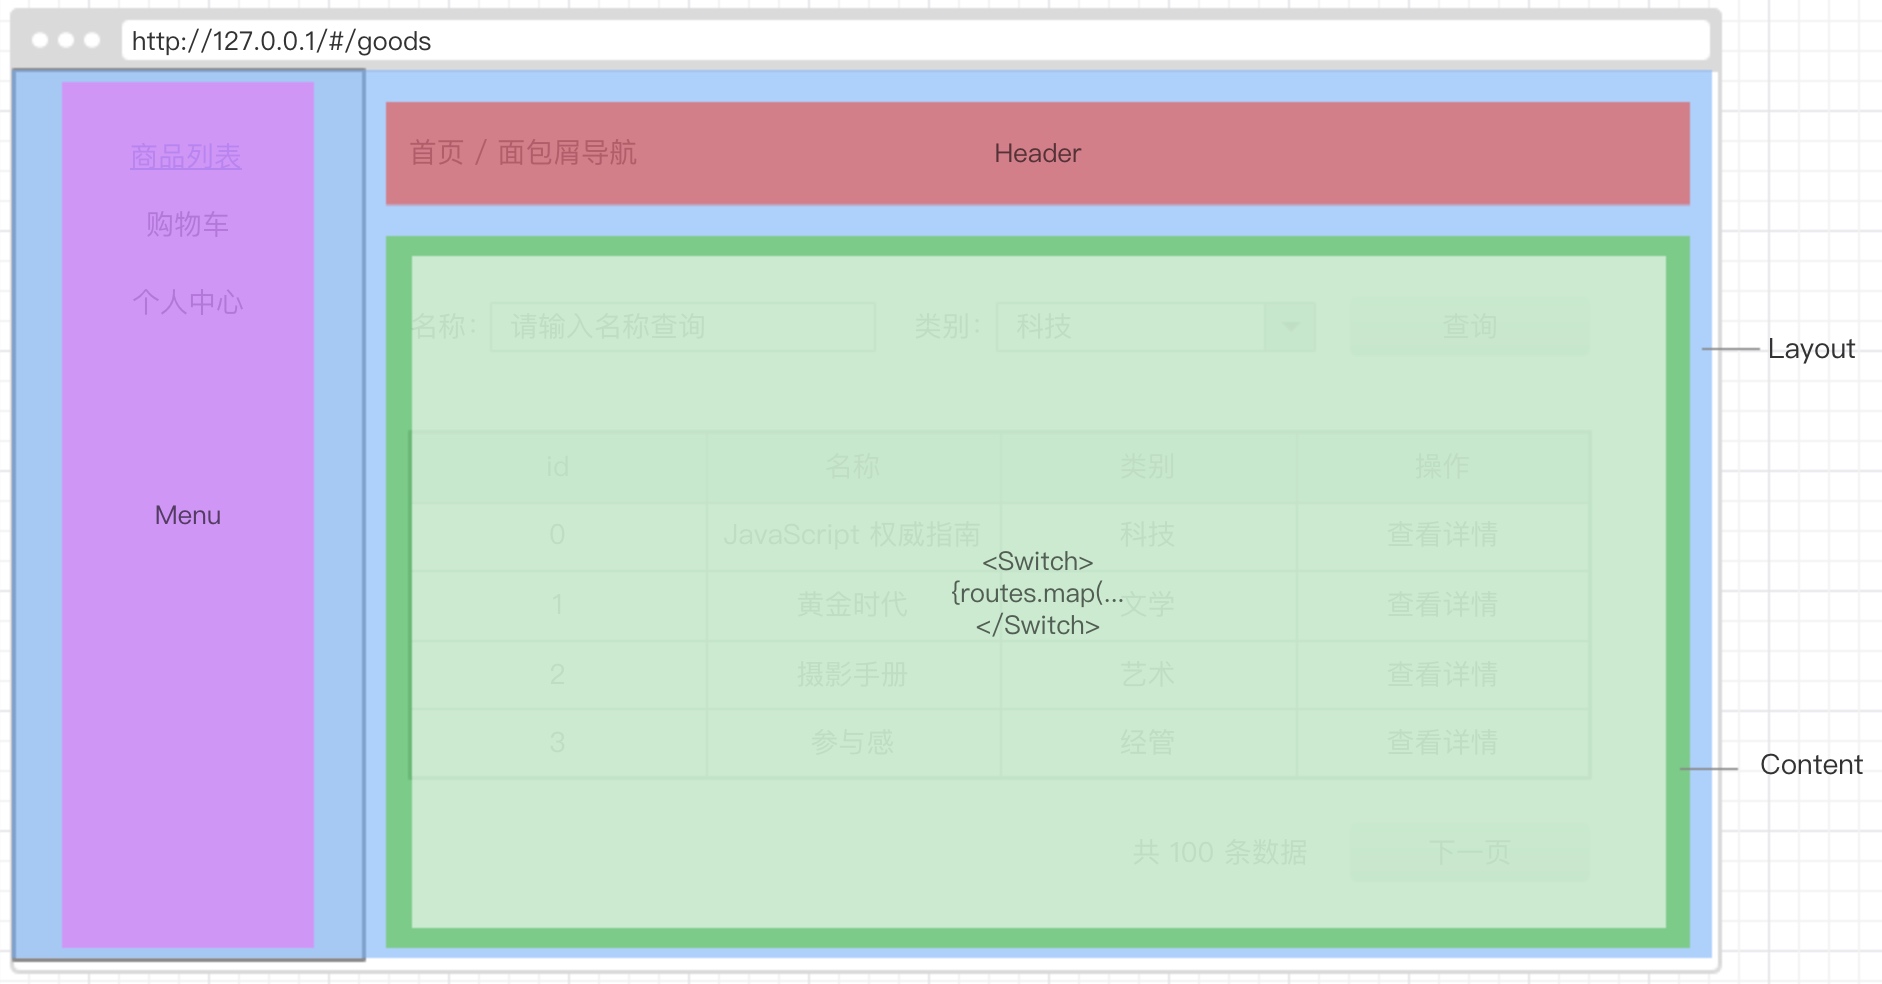
虽然有一些理解成本,但之后只需要关心BasicLayout组件内的<Switch>即可。布局与面包屑导航会在另一篇博客中介绍。

生成菜单

Menu组件位于BasicLayout组件内,所以也可以拿到routes,并生成对应组件即可(示例同上)。

1
2
3
4
5
6
7
8
9
10
11
12
13
14
15
16
17
18
19
20
21
22
23
export default class NavMenu extends React.Component {
renderMenus = (routes = [], parentPath = '') => {
return routes.map(route => {
// replace 用来去除多余的 / 符号
const path = `${parentPath}/${route.path}`.replace(/\/+/g, '/');
return (
<Menu.Item key={route.path}>
<Link to={path}>
<span>{route.name}</span>
</Link>
</Menu.Item>
);
});
};
render() {
const { routes } = this.props;
return (
<Menu theme="dark" mode="inline">
{this.renderMenus(routes)}
</Menu>
);
}
}

可以得到这样的菜单:

初始状态的菜单

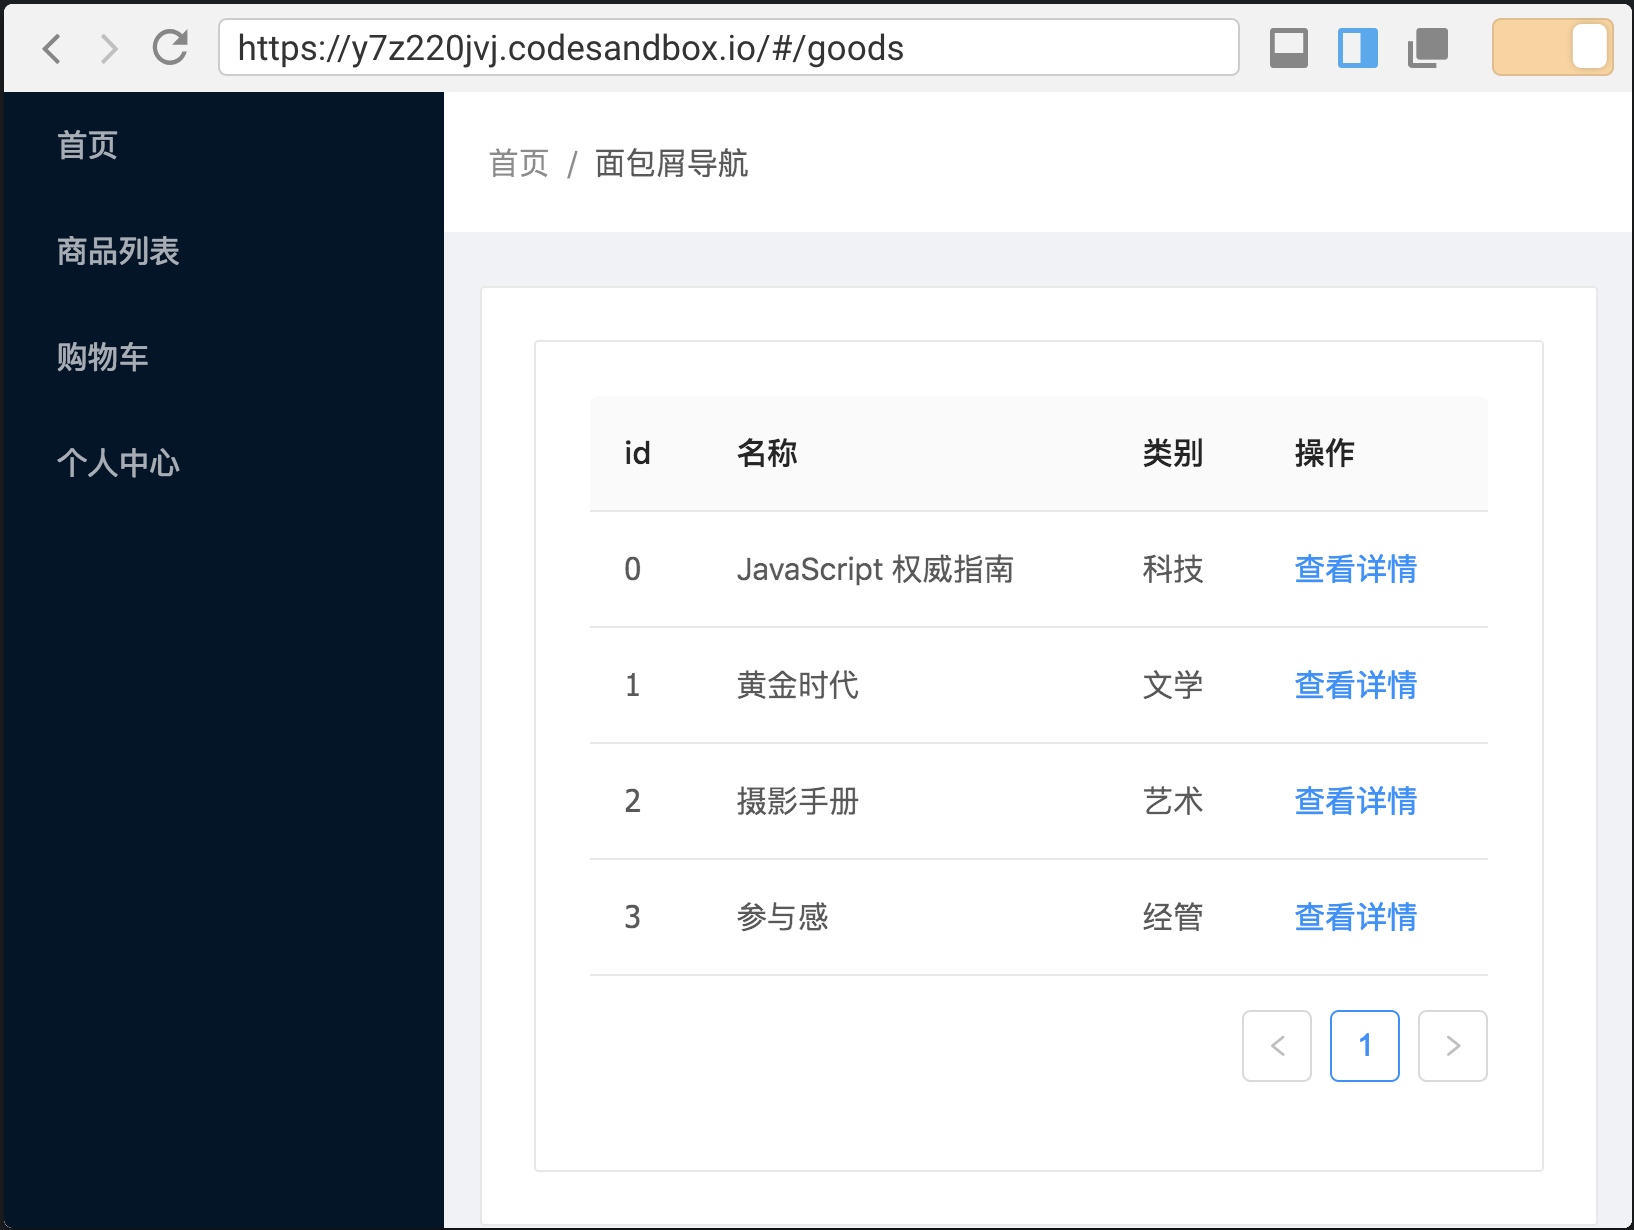
可以发现,虽然按照我们预期,生成了菜单,但存在一些问题

  • 商品详情不应该展示
  • 没有高亮

商品详情不应该展示

自动生成的「商品详情」菜单,点击后跳转到/goods/:id这个地址,对我们来说没有任何作用,所以需要隐藏掉。
解决方法也非常简单,不渲染这条配置即可,可以判断route.path是否包含:符号,如果包含,就返回null

1
2
3
if (route.path.indexOf(':') > -1) {
return null;
}

也可以在routes配置中,添加hide属性,然后在渲染时判断hide === true,并决定是否渲染。如果我们不希望在菜单中展示「首页」,就可以通过这种方式:

1
2
3
4
5
6
7
8
9
10
const routes = [
// ...

{
path: '/',
name: '首页',
component: Home,
hide: true,
},
];

菜单高亮

高亮的原理很简单,获取当前url,判断和哪个菜单项匹配。由于使用HashRouterlocation.pathname不能正确返回我们预期的值。当然这个问题react-router帮我们解决了,可以通过两种方式,第一种是props;第二种是withRouter

1
2
3
4
5
6
7
<Route
path="/"
render={props => {
// props 上有 match 和 location 属性,传给 BasicLayout 后 BasicLayout 也有了
return <BasicLayout {...props} routes={routes} />;
}}
/>

那么先在BasicLayout组件内打印看看这两个属性到底是什么吧

BasicLayout this.props

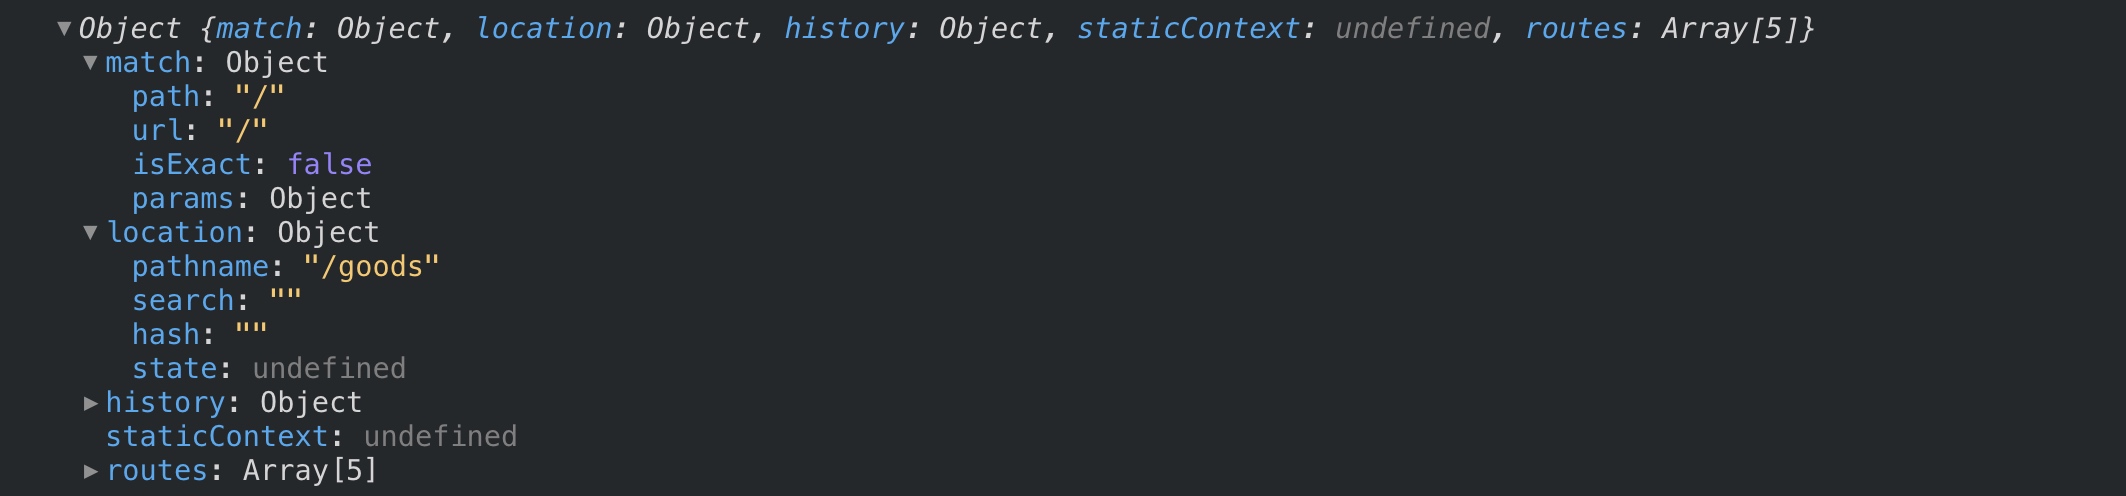
match表示的是当前匹配到的Route的属性,location是当前url的信息。

1
2
3
4
computeSelectedMenuItem = () => {
// 由于使用了 hashRouter,所以必须借助 this.props.match 属性
const { match } = this.props;
}

但无论怎么切换页面,match.path都是/,而不是我们预期的/goods或者/goods/:id

答案也很简单,因为BasicLayout对应的Routepath就是/
实际上,react-router的原理就是,Route组件获取当前url,与自身path对比,如果匹配,就显示自身,否则就不显示。

对应到我们的应用中,就是<Route path="/"这个组件,计算当前/goods匹配自身成功,所以显示出BasicLayout组件。而组件内的<Route path="/goods"组件,也认为当前url匹配自身,所以展示Goods组件。

所以我们暂时先通过props.location.pathname实现高亮。将location传给NavMenu组件,并在组件内维护selectedKeys变量,保存当前选中的菜单项的key,传给Menu就 OK 啦(示例)!

1
2
3
4
5
6
7
8
9
10
11
12
13
14
15
16
17
18
19
constructor(props) {
super(props);
const { location } = props;
this.state = {
selectedKeys: this.computeSelectedMenuItem(location)
};
}
componentWillReceiveProps(nextProps) {
const { location: nextLocation } = nextProps;
const { location } = this.props;
if (nextLocation.pathname !== location.pathname) {
this.setState({
selectedKeys: this.computeSelectedMenuItem(nextLocation)
});
}
}
computeSelectedMenuItem = location => {
return [location.pathname];
};

至此,高亮完成了第一步,我们能发现访问「商品详情」时无法正确高亮「商品列表」,所以接下来解决这个问题。

高亮父菜单

当访问/goods/0时,selectedKeys中保存的是'/goods/0,没有任何菜单的path能正确匹配到,所以没有任何菜单高亮。

所以,我们将该路径分割,得到/goods/0两部分,返回第一部分就能正确高亮了。

1
2
3
4
5
6
7
8
9
computeSelectedMenuItem = location => {
const { pathname } = location;
const paths = pathname
.split('/')
.filter(item => item !== '')
.map(path => `/${path}`);
console.log(paths);
return [paths[0]];
};

虽然满足了我们当前的用例,访问「商品详情」时高亮「商品列表」,但如果出现「子菜单」的情况呢?
将「个人中心」与「购物车」页面,放到一起作为「我的」子菜单,访问「购物车」的路径变成了/my/cart,这种情况必然无法高亮。

修改routes

1
2
3
4
5
6
7
8
9
10
11
12
13
14
15
16
17
18
19
20
21
22
23
24
25
26
27
28
29
30
31
32
33
const routes = [
{
path: '/',
name: '首页',
component: Home
},
{
path: '/goods',
name: '商品列表',
component: Goods
},
{
path: '/goods/:id',
name: '商品详情',
component: GoodsDetail
},
{
path: '/my',
name: '我的',
children: [
{
path: '/cart',
name: '购物车',
component: Cart
},
{
path: '/info',
name: '个人中心',
component: Info
}
]
}
];

但修改完成后,菜单只展示「我的」,而没有子菜单,因为还没有在NavMenu组件中没有对子菜单进行渲染。

1
2
3
4
5
6
7
8
9
10
11
12
13
14
15
16
17
18
19
20
21
22
23
24
25
renderMenus = (routes = [], parentPath = '') => {
return routes.map(route => {
if (route.path.indexOf(':') > -1) {
return null;
}
// 处理子菜单
const hasChildMenu = route.children;
if (hasChildMenu) {
// 如果存在子菜单,就递归渲染
return (
<SubMenu title={route.name} key={route.path}>
{this.renderMenus(route.children, route.path)}
</SubMenu>
);
}
let path = `${parentPath}/${route.path}`.replace(/\/+/g, '/');
return (
<Menu.Item key={route.path}>
<Link to={path}>
<span>{route.name}</span>
</Link>
</Menu.Item>
);
});
};

虽然菜单正常显示了,但当访问/my/cart时,并不能正确展示Cart组件。同样是因为在路由渲染时,没有处理「子页面」的情况。

这里特意使用了「子页面」,而不是「子路由」。因为/my页面与/my/cart页面不是嵌套路由的关系,并且/my并没有实际的页面。

所以需要修改BasicLayout组件内渲染路由的方式,本质上类似如下配置(嵌套路由的配置):

1
2
3
4
5
6
7
8
9
10
11
12
13
14
15
16
17
18
19
20
21
22
23
24
25
26
27
const ChildRouter = (
<Switch>
<Route path="/" exact component={Home} />
<Route path="/goods" exact component={Goods} />
<Route path="/goods/:id" component={GoodsDetail} />
<Route
path="/my"
render={() => {
return (
<Switch>
{/* 不能用 /cart 而必须用 /my/cart */}
<Route path="/my/cart" component={Cart} />
<Route path="/my/login" component={Login} />
</Switch>
);
}}
/>
</Switch>
);

export default function RouterConfig() {
return (
<Router>
<Route path="/" children={ChildRouter} />
</Router>
);
}

所以我们最终的BasicLayout是这样的(最终的代码):

1
2
3
4
5
6
7
8
9
10
11
12
13
14
15
16
17
18
19
20
21
22
23
24
25
26
27
28
29
30
31
32
33
34
renderRouterConfig = (routes, parentPath = '') => {
return (
<Switch>
{routes.map(route => {
let path = `${parentPath}/${route.path}`.replace(
/\/+/g,
'/'
);
if (route.children) {
return (
<Route
key={path}
path={path}
render={() => {
return this.renderRouterConfig(
route.children,
path
);
}}
/>
);
}
return (
<Route
key={path}
path={path}
exact
component={route.component}
/>
);
})}
</Switch>
);
};

确实发现路径/my/cart时,「购物车」菜单项并没有高亮,所以需要修改返回的selectedKeys,能够满足两种情况。

维护一个全局变量,保存所有的路由,即

1
2
3
4
5
6
// 在生成菜单项时新增
this.paths = {
'/goods': true,
'/goods/:id': true,
'/my/cart': true,
};

如果当前props.location.pathname能够在this.paths中找到,表示不包含动态参数,返回pathname。如果是/goods/0,无法匹配到,所以返回经过处理的。

1
2
3
4
5
6
7
8
computeSelectedMenuItem = location => {
const { pathname } = location;
const paths = pathname
.split('/')
.filter(item => item !== '')
.map(path => `/${path}`);
return this.paths[pathname] ? [pathname] : [paths[0]];
};

即使是更复杂的例子,如三层菜单也能正确处理。